
Table of Contents: (Click on topic to jump to that section of the document)
Upon Receiving Your New Williams 700 Series Pedal Steel Guitar
Setting up your guitar consists of some basic assembly. First, place the guitar's case on its side, unlatch the case latches, open the case, and remove the leg bag. Pull a leg from the pouch, and proceed to screw it into the end plate while the guitar remains in the case. Repeat this process until all four legs are installed. The next step is to attach the pedal bar, which should be in the side compartment in the case. Take the pedal bar with both hands, slide the locking plates in toward the center of the bar, and attach to the front two legs of the guitar. While holding the pedal bar with one hand, slide one of the locking plates out, over the leg, and secure it with the black locking nut. Repeat this process for the other leg. In the leg bag, there should also be the pedal rods. The factory numbers each pedal rod to help make set up easier. Locate the pedal rod numbered one (1), take the end with the "hook" and carefully, loop through the hole on the pedal actuator arm on the guitar. Now, take the other end and attach the ball connector to the pedal. Repeat this process for the remaining pedal rods.
Your guitar is now ready to be removed from the case. With both hands, grab two legs diagonally, carefully, lift the guitar out of the case, and place it right side up on the floor. If necessary, adjust the rear leg heights to ensure that the guitar does not rock on the floor. Finally, connect an audio cord from the guitar's jack to a volume pedal, and connect an audio cord from the volume pedal to your amp. Turn on your amp, and you are now ready to start playing
When you receive your new Williams it (i.e. the guitar and case) will be thoroughly packed in a carton. Once the package is brought indoors, it should be removed from the shipping carton. However, the guitar whilst still in the case should be allowed to acclimate itself to the temperature in your dwelling. This process may take a few hours, depending on the temperature variation. The reason why we advise this is because depending on what part of the country (or world for that matter) in which you live, temperatures, humidity, dryness, etc. can all vary greatly. Wood and aluminum can expand and contract with environmental changes enough to affect the tuning of the guitar. If you tune a guitar that is still acclimating to its environment, you'll most likely have to tune again! Letting your instrument acclimate itself to its surroundings is a wise practice for gigging musicians too!
The followings items should be found in the guitar case; the guitar!, and tuning wrench kit (Allen wrenches, and hex nut tuning wrench).
Williams Guitar ships guitars with the guitar case handle exposed through the shipping carton. This is done to help encourage/ensure that the courier companies handle the guitar properly and with care. We advise that customers save the carton in case they ever wish to ship the guitar in the future. We often get requests for additional knee lever installations, copedent changes, etc. and we believe it is best to ship the guitar, in its case, all within a carton. Depending on the shipping method used, your guitar can go through a number of handlers! Tip: it's wise to save all the shipping cartons from all your music product purchases, for the reasons listed above
The approach to tuning a pedal steel guitar is a topic widely discussed, and the topic could literally fill a book. Many musicians have different techniques, and attitudes about the tuning process, but the common goal is to get the instrument in tune. The purpose of this section is to provide the beginning steel player a step-by-step guide to help them through the process. Tuning a steel guitar can be a bit of a daunting task if one is migrating to steel from being a six string slinger! So, we thought it would be a helpful addition to the owner’s manual. Likewise, as for the seasoned player, this section might be advantageous to read as well, because you might pick up a tip or two, and may give you fodder for the next great tuning debate!
Let's get started! Tuning 101. The fundamental concept of tuning is to compare the pitch to be tuned, which could be a guitar string, piano string, bass guitar string, etc. to a reference tone that is a fixed pitch. This requires that one has a source for the fixed pitch, which could be a tuning fork, another instrument, or an electronic tuner (more on electronic tuners later). The tuning process is rather simple once a very important concept is understood. As mentioned above, tuning involves two pitches, one that needs to be tuned or referenced to a fixed pitch, these two pitches are initially slightly different, and when played together create what is commonly called "beats." These beats are pitch fluctuations, which can be brought in line by adjusting the tuning peg. By turning the tuning peg, one can tighten or loosen the tension on a string which can then be manipulated to match the pitch of the reference tone. For example, let’s say you have an "E" tuning fork, and want to tune a string to the pitch "E." Strike the string, and now strike the tuning fork. Listen to both tones, if they are out of tune with each other, audible "beats" will be produced. The rate of the "beats" can be manipulated with the tuning peg. Turn the tuning peg until the "beats" are eliminated or are "in sync" with each other. Once the two pitches are the same, with no audible beats, you are in tune!
Once the "open strings" on the guitar are tuned, now the pedals and knee levers can be tuned. The tuning of pedals and knee levers is very similar to the open string tuning process, with the exception that instead of turning the key heads, the hex nuts in the "changer window" are used instead.
Every guitar shipped from the factory undergoes a “tune and tweak” process before being shipped to the customer. Your guitar has been adjusted for proper operation, and no radical adjustments should be done. Therefore, while tuning pedals and knee levers, only minimal adjustments need to be made to tune the pedal or knee lever. To tune a pedal, "pump" the pedal, and locate its hex nut moving in the changer window, place the tuning key on the nut, and tune it to its proper pitch with the pedal engaged. Once again, as with tuning open strings, a pitch reference will be needed to tune properly. Depending on the note to be tuned, many players will strike a matching open string to reference to. Repeat this process for every pedal on your guitar.
The material in this document is copyright to Williams Guitar Company, LLC all rights reserved, and may not be reproduced in any form without written permission from the company.
Williams Guitar Company, LLC, provides this manual as a reference for the user, and as such, the company reserves the right to make changes to the manual, as it deems necessary, without any obligation to notify any person. Use of this manual is at your own risk.
The following third party products are referenced in the manual: Teflon®, and Delrin®, both of which are Registered Trademarks of the E.I. du Pont de Nemours and Company respectively. Grover® which is a Registered Trademark of Grover Musical Products.
Contact Information:
Williams Guitar Company, LLC.
20230 Vintage Drive NW
Oak Grove, MN 55303-8987
Phone: (763) 753-8645
www.williamsguitarcompany.com
The tuning of knee levers is basically the same process as tuning pedals. Work the knee lever to be tuned with your leg, and look for the moving hex nut in the changer window. Place the tuning key on the nut and tune the lever to the proper pitch with the knee lever engaged. Repeat this process for all of the knee levers on the guitar.
Since splitter rods are an option on the 700 Series, if you did not opt for splitter rods, then you can skip this section, because it will not pertain to your guitar. If you do have the splitter rod option, the following is an explanation of how to tune the splitter rods on strings 5, 6 and 10. The first thing to do is to completely tune your guitar, open strings, pedals and knee levers. Now, for demonstration purposes, we will tune the splitter rods for strings 5 and 10. Start with the first pedal and the vertical knee lever (VKL) engaged, tune the B to C# split note down to C. The split note (C note) is tuned with the lowering rod hex nuts. Once the C note has been tuned, now engaged the VKL only, pick string 5 or 10, now you will notice that the B to Bb change is flat! This is corrected by raising to pitch the splitter rod hex tuning nut. That’s all there is to it!
Split Tuning Examples:
Vertical Knee Lever (VKL) = Lowers B to Bb
Pedal 1 = Raises B to C#
VKL + Pedal 1 = C (the split note)
Pedal 2 = Raises G# to A
KL = Lowers G# to F#
Pedal 2 + KL = G (the split note)
The 700 Series key type tuning heads are now a one piece assembly that improves tone and sustain over our past designs. Likewise, the key head is shorter in length than most makers, which improves the pedal and knee lever action of the guitar. The key head features industry standard Grover® tuners.
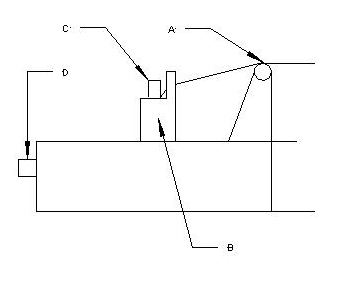
A. Gauged String Roller
B. String Block
C. 3/16" Hex String Hold Down Screw
D. 3/16" Hex Tuning Screw
Important: String blocks should be approximately alongside each other on the gearless tuner assembly. In addition, the "floating" 3/16" hex tuning screws should be pushed or tapped back into position before restringing.
When restringing, be sure to position the string block a ¼” from the nut.
To replace a string on a keyless tuning assembly, loosen the string hold-down screw on the string block, and remove the old string. Take a new string and thread it through the changer eyelet, and then thread it through the eyelet of the string block. Now, pull the string tight around the rear portion of the string hold-down screw. Tighten down the hold-down screw, wiggle the string tail until it breaks off. When replacing heavy gauged wound strings, cut off the excess string with side cutters.
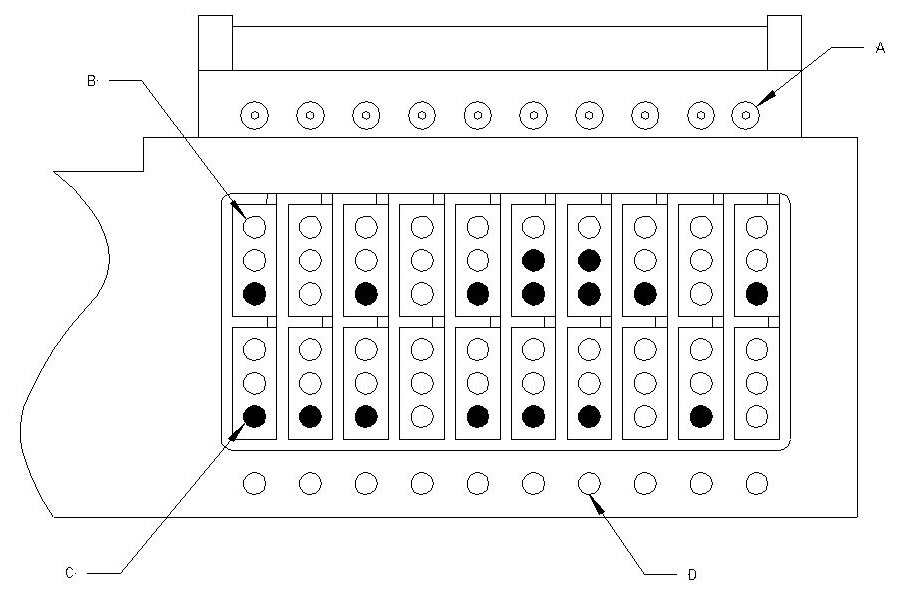
A. Splitter Screws
B. Raising Changer Arm
C. Lowering Changer Arm
D. Changer Return Spring Adjuster Screw
By following some basic maintenance procedures, as the following section outlines, your 700 Series guitar should provide you with many years of trouble free playing and reliability.
To remove dust from a Lacquer type or Formica finish guitar, merely wiped down with a soft, clean, dry cloth (cotton recommended). Forced air or computer keyboard cleaner is not recommended! Likewise, the polished aluminum parts may be wiped down with a soft, clean, dry cloth as well. Should the aluminum become oxidized, then any number of commercial aluminum polishes maybe used to restore its luster.
All guitars are lubricated before being shipped from the factory. However, eventually the guitar will need to be lubricated. We recommend purchasing a Williams Needle Oiler. The Williams Needle Oiler has a long needle on it to reach those hard to reach places. Likewise, the Williams Needle Oiler uses a Teflon® lubricant which will ensure smooth, quite operation. The Williams Needle Oiler is available on line in the Williams Store.
We recommend storing your guitar in its case, in a temperature and humidity controlled room. This is wise council for any instrument that is vulnerable to excessive heat, cold, humidity or dryness.
As mentioned earlier in this manual, all guitars are “tuned and tweaked” at the factory before they are shipped out. Therefore, no drastic adjustments should be made to the guitar. Instead, any adjustments made should be to aid in your playing comfort. Williams Guitars are designed with fully adjustable pedals and knee levers.
Pedal height (i.e. raised or lowered) can be adjusted via the pedal rod ball coupler. To make an adjustment, first loosen the 10-32 locking nut (uses a 3/8” wrench) next to the ball coupler, and then turn the ball coupler (clockwise/counter clockwise) to raise/lower the pedal. Once the desired height has been found, secure the position of the ball coupler by tightening the nut.
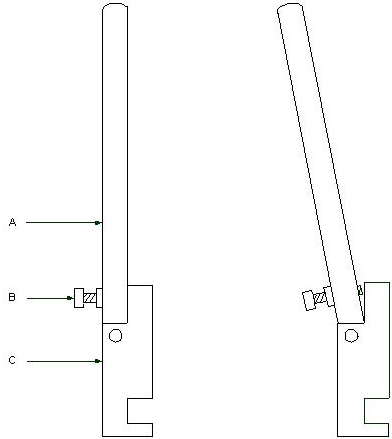
A. Knee Lever Arm
B. Angle Adjusting Screw
C. Knee Lever Cross Shaft Mount
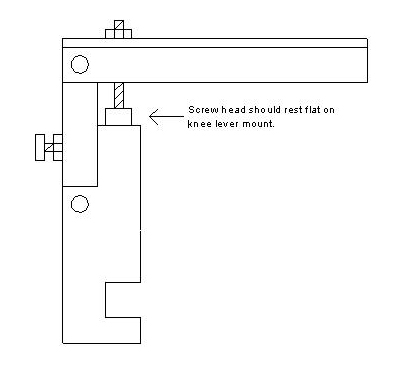
Knee lever slant adjustment may be made by simply loosening the nut on the angle adjusting screw and turning the adjusting screw in or out for the desired angle. Please note as well, that on Vertical Knee Lever’s (VKL) that when the lever arm is brought down perpendicular to the knee lever cross shaft mount, that the adjusting screw is touching the topmost area of the knee lever mount. Please see appendix illustration for more information.
New to the 700 Series model is the patent pending Pedal Rod Clip. The pedal rod clip will allow for adjustments in pedal action. We find that every steel player has different action preferences, and now via the pedal rod clip, playing comfort can be zeroed in! For shorter, faster action, adjust the clip towards the cross shaft. This will result in slightly stiffer action. Likewise, for longer, easier action, adjust the clip away from the cross shaft. To move the clip, simply loosen the screw (utilizes a 9/64” hex wrench), slide the clip in the desired direction, and refasten the screw securely.
The raise helper springs are pre-set at the factory, and we strongly recommend that you do not readjust them. However, if the Raise Helper Spring is readjusted, be sure the tension doesn't interfere with the lowering action of the changer.
When a lowered string returns sharp, the pitch return compensator maybe engaged. To correct this, simply turn the compensation tuning nut in to slightly lower string pitch.
Changer return springs are pre-adjusted at the factory. If an adjustment is needed, please do the following: if the changer lowering lever doesn’t return against the stop plate, tighten changer spring until the changer lever returns to stop plate. Tip: changer lubrication may be needed also.
Please follow these instructions when making adjustments to the 2nd string feel stop. First, tune the 2nd string open (D# note). Now, with the Right Knee Right (RKR) Knee Lever engaged, tune the 2nd string a full step lower (D# down to C#). Next, tune the 9th string open (D note). With the RKR knee lever engaged, tune the 9th string a half step lower (D down to C#), the 2nd string split (D note) will occur automatically. Please note that the knee lever “action” of the 9th or 2nd strings can be changed by changing the pull rod position in the bell cranks. However, these pull rods are pre-set at the factory, and most likely will not need to be changed. Also, the “bump stop” feel can be increased by tightening the 9th string changer spring.
Depending on what type of pick up you had installed in your custom made Williams, the style of pick up will determine how high the pickup height should be. Generally, Humbucker style pickups may be closer to the strings than single coil pickups. As a rule of thumb, single coil pickups should be approximately two stacked American quarter’s height below the strings. Humbucker pickups on the other hand, can be slightly closer. Pickups are mounted with four adjustable mounting screws. Many musicians like to tweak a pick up height in the quest to achieve their ultimate desired tone. Likewise, some pickup manufactures offer pickups with adjustable “poles” to tweak tone down to the individual string.
All pedals and knee levers need “tuning slack,” that is, a small amount of “play” when in the neutral position. All pedals and knee levers have slack adjustment screws, and are pre set at the factory. To change slack, simply turn in or back out the slack adjuster screw. (6/32” screw, utilizes a 7/64” hex wrench).
If you ordered your 700 Series guitar with the splitter rod option, you can skip this section, because the rods were installed at the factory. However, if you bought splitter rods from Williams Guitar Company, LLC here are the instructions to install them. These instructions will work for all models of Williams Guitars (400 Series, 600 Series, etc.). First, make sure that the included rod retainer spring is on the rod (3/32”), with the “hook” end toward the “hook” end of the rod. Now, feed the threaded end of the rod through the first raise hole (changer hole closest to the bottom of the guitar) of your 5th string changer lever, and attach the “hook” end to the same 5th string bell crank on the Vertical Knee Lever (VKL). We recommend to use the bell crank slot closest to the cross shaft (slot 1). Finally, attach the spacer, and the 3/16” hex nut in the changer window. Your tuning wrench can be used to screw on the hex tuning nut. This process can be repeated for strings 6 and 10 if so desired. Please see the tuning section of this manual for instructions on tuning the splitter rods.
User installation of additional pedals or knee levers is not recommended for the mechanically challenged. Depending on the complexity of your set up, adding pedals and knee levers can turn into a major project. Therefore, we recommend that you have any additional pedals or knee levers for your Williams installed at the factory. For those brave enough to tackle an installation project, be forewarned, that many times installation requires removing pull rods, drilling into the body of the guitar, etc. So, think seriously about what all is involved!
Unlike adding a pedal or knee lever, adding a “pull train change,” that is, adding another bell crank is relatively simple, and can be completed by the user. Pull train kits are available by calling and ordering or in the Williams Store.
If you decide to order a pull train kit, it is essential that you use the proper length rod. To determine rod length, place the guitar on its back, either in the case or on a workbench. We recommend placing a towel down on the workbench to prevent scratching the finish of the guitar. With the underside of the guitar exposed, hook a tape measure onto the end plate near the 1/4" plug in jack. Now, measure to the center of the cross shaft where the new bell crank is to be installed. This is the measurement you need to order the pull train kit. A pull train kit will include the following: 3/32” threaded pull rod, bell crank, bell crank securing screw (4-40)(utilizes a 3/32 hex wrench), 3/16” hex tuning nut, tuning nut spacer, and rod retainer spring.
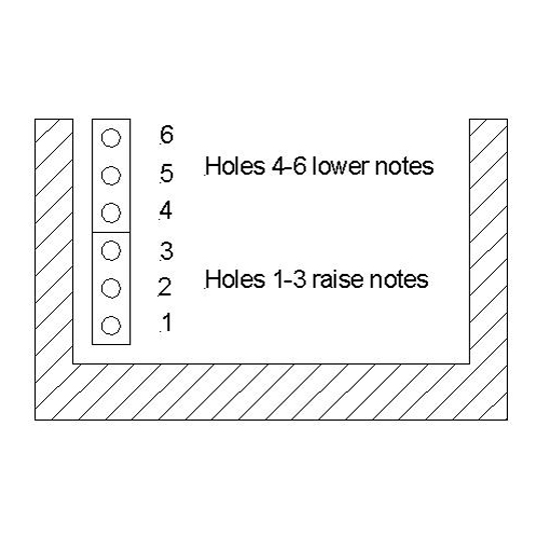
Installation is rather straight forward. Start by placing the rod retainer spring on the rod so that the hook end of the spring faces toward the hook end of the rod. Now depending on whether you want your new change to raise or lower a note will determine where the rod is placed in the changer. When the guitar is upside down, the top 3 holes are for lowering notes (located closest to the changer springs), and the bottom 3 holes are for raising notes. The opposite is true when the guitar is upright. Please see the changer end illustration in the Tuning section of this manual for reference. Place the threaded end of the rod in an available changer lever hole, and lay the rod parallel to the other rods to determine where the bell crank should be installed. To install the bell crank, simply slide the bell crank onto the shaft, just like all the others, and secure with the included bell crank screw. Now, hook the rod into the correct bell crank slot as determined by the rodding charts provided in the appendix of this manual. Next, take the hook end of the rod retainer spring and pull it around the bell crank. This can be done by using a small flat head screw driver. Finally, place the spacer on the threaded end of the pull rod, followed by the hex tuning nut itself. Please refer to the tuning section of this manual for information on tuning your newly installed pull train.
If you are changing the set up please refer to the provided rodding charts for optimum balanced pulls. Try to follow the chart as closely as possible, although, slight variation is acceptable. Rodding charts are available on the copedents page.
For your reference, we have provided rodding charts for E9th and C6th set ups. Also provided is a rodding chart for E9/B6 Universal set ups. This information is located on the copedents page.
The tear down process is basically the reversal of the set up procedure. To begin to tear down your guitar, begin by turning off your amp, and then unplug the audio cable from the guitars output jack. Next, you will need to open the guitar case, and locate the leg bag. Set the leg bag to the side for the time being. Now, while facing the guitar from the front, grab the guitar legs diagonally, carefully lift the guitar, and place it into the case. Be sure to make sure that the pedal bar is "away" from you, or it may strike you. With the guitar upside down in the case, detach the pedal rods, by uncoupling the ball connector first, and then the hook from the pedal actuator arm. Repeat this process for the other pedal rods until all of them are removed. Place all the pedal rods in the leg bag for safe keeping. Now, the pedal bar can be removed. Now, with one hand holding the pedal bar, loosen one of the leg lock screws, and slide the locking plate towards the center of the pedal bar. Repeat this process for the other leg lock. Take the pedal bar and place it in the case, in the side compartment. Unscrew each leg, and place them in the leg bag. Once all pedal rods and legs are in the leg bag, place the leg bag in the case, in the same compartment as the pedal bar. Finally, close the cover on the case, secure the latches, and set the guitar case handle side up. You are now ready to move on to your next gig!
The tuning of your steel guitar depends on the "copedent" set up of your guitar. Traditionally, E9th and C6th "open tunings" have been the standard, but some player's experiment with other tunings and set ups. This section will describe tuning the open strings first, and then the following sections will cover tuning of the pedals and knee levers. Unless you have "perfect pitch," you will need some type of pitch reference, many player's use tuning forks or electronic tuners. Beginners may find electronic tuners to be the easiest to use, and for that matter, experienced musician's like them for their quick and easy operation. Since there are numerous electronic tuners on the market, please refer to your tuners user guide for operation instructions.
To tune your Williams 700 Series guitar, you will need a pitch reference device (i.e. tuning fork, electronic tuner, etc.), and in the case of "Keyless" owners, you will need the "hex nut wrench" too. Beginners may want to have a copy of their copedent chart on hand too for occasional reference. Once all of the essential tools for tuning are at hand, one can begin tuning.
For demonstration purposes, we will be tuning a 10 string E9th tuning. The same concepts that will be presented here apply to 12 string "Universal," "Extended E9th," "Gospel" and "C6th" set ups as well.
Williams Guitar Company, LLC considers the following string/note combination to be "standard" for E9th:
| String | Note |
| 1 | F# |
| 2 | Eb |
| 3 | G# |
| 4 | E |
| 5 | B |
| 6 | G# |
| 7 | F# |
| 8 | E |
| 9 | D |
| 10 | B |
Depending on what pitch reference device you have, it may dictate where you begin. For example if you only have an "E" tuning fork, you would start with strings 4 and 8. On the other hand, if you have an electronic tuner, you can begin anywhere. We encourage the purchase of an electronic tuner because it will make tuning much easier and quicker.
Begin by tuning a string to your reference pitch. Typically, once a string is in tune, one can "chime" another string to it, and bring that string to pitch. For example, if you used an "E" tuning fork as your reference pitch, you could tune string 8, and then reference the tuning of string 4 to that of string 8. Likewise, by "chiming harmonics" at the seventh fret, one can reference other notes. This technique is essential if you do not have an electronic tuner. To harmonically chime a string, pick the string with your right hand, while gently placing a left hand finger on the 7th fret. The mastering of this technique might take some practice, but when done correctly, will produce a bell-like (chiming) tone. This technique is commonly used by guitarist, and can be used to great musical effect on the steel guitar. The following chart shows what notes will be produced at the 7th fret:
String |
Open Note |
7th Fret Note |
| 1 | F# |
C# |
| 2 | Eb |
Bb |
| 3 | G# |
D#/Eb |
| 4 | E |
B |
| 5 | B |
F# |
| 6 | G# |
D#/Eb |
| 7 | F# |
C# |
| 8 | E |
B |
| 9 | D |
A |
| 10 | B |
F# |
Continuing on with our example above, once you have the "E" strings (4 and 8) tuned, you can begin to chime notes, to bring the other strings to pitch. For example, chiming string 8 (E) at the seventh fret will produce a "B" note. Now, you can use this "B" note to tune strings 5 and 10 respectively. It's simply a matter of chiming string 8, and picking string 5 and bring it to pitch. Once strings 5 and 10 are in tune, you can chime either of them at the seventh fret, and produce an F# note. Now, you can tune strings 1 and 7 to the harmonically chimed string(s) 5 or 10.
So far we have strings 1, 4,5,7,8 and 10 in tune, and the remaining strings of 2, 3, 6, and 9 to be tuned. Tuning the remaining strings is bit trickier, because we can't chime it to another string, and this is where an electronic tuner would save the day! If you do not have an electronic tuner, then one would have to use a tone bar (or slide) to create the reference note for the remaining strings. For example, to tune string 2, an Eb/D# note, one could hold the tone bar at fret 1 (Eb/D# note) on string 2, hit the string, and then hit string 4 open, and bring it to pitch. To tune strings 3, and 6, both G# notes, one could hold the tone bar at fret 4, on string 8 (G#), and proceed to tune strings 3 and 6. Finally, string 9, a D note, could be tuned by holding the tone bar at fret 3 on string 10 (a D note), and bring string 9 up to pitch. This concludes our beginner’s tuning section. As you can see, an electronic tuner would make things much easier!
Introduction:
Thank you for purchasing a Williams 700 Series Pedal Steel Guitar. We truly appreciate your patronage. You now own a custom made, professional grade instrument that has been hand crafted in the United States. Williams Guitars can be found the world over, heard in a variety of recordings, and seen on many top stages. We believe that your new Williams will bring you many years of playing enjoyment, with the proper care and maintenance as outlined in this manual. Please take a moment to read through this manual because there are a number of important topics covered, as well as tips every steel player should be aware of. Enjoy!